

Moving an Exchange Server to a new server with the same Exchange Server version is often required when organizations want to upgrade their server hardware or move their existing Exchange server from a Virtual Machin (VM) to Physical Machine.
In a nutshell, this type of migration requires you to move data from one Exchange Server to another without disrupting the current Exchange Server environment and the email services or with minimal downtime.
In this guide, we will discuss steps to move Exchange Server 2016 to a new Exchange Server 2016. However, you can also refer to this guide to move Exchange Server 2016 to 2019.
Steps to Move Exchange Server 2016 to New Server
Although you can simply clone the storage drive on the current Exchange Server 2016 to the new server using any disk-cloning app, it is not recommended.
Cloning requires you to shut down the current server to clone the drive that will lead to downtime and may cause data loss if something goes wrong during the cloning. Moreover, it is highly recommended to do a clean install on the newer server to avoid new problems and fix existing issues.
You should install new Windows Server OS on the server machine and set up Exchange Server 2016 setup from scratch. Refer to this guide on setting up a new Exchange Server 2016 or 2019 to learn more.
After installing and setting up the Exchange Server 2016 on the new server, follow these steps to configure your new server and decommission the old one safely.
Setup OWA and Other Services
To set up OWA or Outlook Anywhere, login to Exchange Admin Center (EAC) as administrator and then follow these steps,
- Click ‘servers’ and then select the Exchange Server name from the list.
- Click the ‘Edit’ (pencil icon) and then click the ‘Outlook Anywhere’ option.
- Update the internal and external FQDN and then click ‘Save.’
You can check the FQDNs and configuration settings on your existing Exchange Server 2016 and replicate them on the new server. However, IP needs to be different and can’t be the same.
Setup SCP
Service Connection Points or SCP need to be updated on the new Exchange Server. This step is critical to avoid users from connecting to the new server as it’s not yet ready. For this, follow these steps,
- Open Exchange Management Shell (EMS) and execute the following command,
Set-ClientAccessService –Identity ExchangeServer2019 –AutoDiscoverServiceInternalUri https://mail.YourDomainName.com/Autodiscover/Autodiscover.xml
Change mail.YourDomainName.com in the command.
This will redirect the users to the current (old) Exchange Server 2016 server.
Import SSL Certificate
You can export the SSL certificate from your current server or get a new valid certificate from the certificate authority and then import it to your new Exchange Server using Exchange Management Shell or Exchange Admin Center.
On your old Exchange Server 2016,
- Open EAC and go to servers>certificate.
- Click ‘…’ and choose Export Exchange Certificate.
- Enter a UNC path and provide a password to encrypt the certificate. Remember the password as you will need it later. Click ‘OK.’
Copy the certificate from your old server to the new server at a UNC path and then follow these steps,
- On your new Exchange Server, go to servers>certificate and click ‘….’
- Choose ‘Import Exchange Certificate.’
- Enter the UNC path with certificate name, enter the password, and click ‘next.’
- Select the server and click ‘finish.’
Update Virtual Directories and DNS Records
You can use EAC or EMS to update the internal and external URLs in virtual directories for ECP, OWA, Web Services, ActiveSync, OAB, and MAPI. Then update the DNS records. The steps are as follow,
- In EAC, navigate to server > virtual directories and double-click on ECP.
- Enter the FQDN in Internal and External URL fileds and repeat these steps to update the Internal and External URL fields for OWA, OAB, ActiveSync, Web Services, and MAPI.
Migrate Mailboxes
Now you are ready to migrate the mailboxes from the current Exchange Server to the new server 2016. You may use the manual approach to export the mailboxes into individual PSTs and then import them to the new server using Exchange Management Shell (EMS) or Exchange Admin Center (EAC). You may also go to recipients>migration in EAC and then choose Move to a different database.
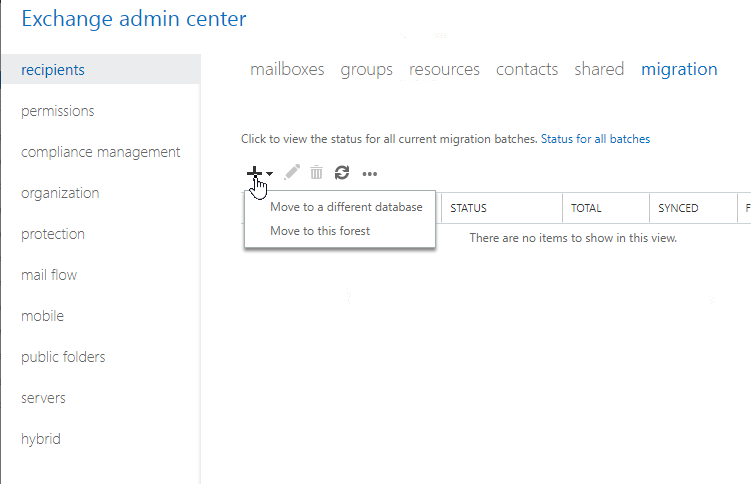
However, this may take significant time and cause longer downtime.
An easier and much faster way is to use an EDB converter tool, such as Stellar Converter for EDB, to directly export mailboxes from your current Exchange Server 2016 database to the new Exchange Server 2016 database. It will cause a minor downtime, as you need to dismount the database to extract mailboxes and export them to the new server using the software. The software utilizes a parallel processing technique, which processes up to 4 mailboxes simultaneously on the new destination Exchange Server.
Decommission Old Exchange Server
Before decommissioning your old Exchange Server 2016, you need to ensure that the new server is working properly and users can connect to their mailboxes and send/receive emails. It is recommended to shut down the old Exchange Server for a few days to test and verify the new server.